Showing posts with label handcraft. Show all posts

Wednesday, August 19, 2020

Little fishes near the pool

 I did think that just having a white ceiling could have been a bit blend in an already simple poolhouse. Not that it needs to become anything complex but I think having some decoration it would embellish it and make it more welcoming and particular.

I had a vision on how it was supposed to be, but it is always very hard to transmit what you have in your thought to someone else while also accomodating Mattias' wishes to have something water related theme. 

After painting the whole ceiling with white linseed paint, we got a rim of little fishes painted with acrylic colors, catching on the shade of blue and brown of the mosaic tiles on the walls.

The tiles and the fishes goes in the same tones

The fish motif is taken from a stencil which reminds of a mixture of jugend and art deco. Using a stencil on the ceiling was not a straightfoward operation and required a bit of turpentine to clean out the first trials.
A close up on the fishes
The poolhouse is then getting relatively close to be completed. I still have to finish the exterior and the doors and the windows. I should have been done in june... :)

A vintage look for some fishes

Wednesday, June 24, 2020

They are back!

Once upon the time I feel in love with a furniture set. An IKEA (!) set "1700-talet", (hand)made in the 90s. After some digging I eventually managed to buy what I thought would fit in our veranda.

Unfortunately, though, it took few years and its age started to appear in terms of holes a bit everywhere and a bit too much.
So, I thought we would have to fix it up. Also this.

But now, they are finally back. It was a bit sad to see the "naked" couch and not be able to use it at all. Not that we sit there often anyway, but at least the look matters quite much ;)
The couch and the foot rest
Sadly, the exact same textile was not available. It had bigger squares. I don't know if by searching for more than the time I put into it, I would have actually succeeded in finding the right one. I do not like so much to compromise with how things were originally.

The armchair. The covers for the arm supports are still to be finished
We are almost nailing this. A small piece of textile needs to be ordered furthermore for the arm supports cover. They were simply too short and looked a bit weird (again... I have hard time with copromises...).
But, finally! We can sit there! I am sure the cats will be happy :) The foot rest was one of Pico's favorite places to sleep.

Wednesday, April 8, 2020

Gilding

I think I have definitely underestimated this art as I thought it would have turned out almost as doing some standard DIY.

Anyway, for some reason the blacksmith didn't take/couldn't fix the right metal for some of the small things I did request him to fix for us once upon the time.
When I explored how to fix it, so it would look as they were supposed to, I found out that I could use this gilding technique.

I did buy all the material needed and, after waiting few years to mature, I tried it out...
One of the metal details (a small ball) from Oscar's bed as the blacksmith delivered it to us. Few were missing, so we asked him to make them. 
This is one of the ball as the bed came equipped with. Unclear if it is the metal that is golden or it is painted or what. I actually haven't put effort in trying to understand it.

The result after gilding


A better close up
Putting the gold leaf was far from easy. For some reason it wasn't covering as it should so I had to apply and apply and apply. 
It doesn't look too smooth, but I thought that in this case the result was acceptable.


I did the same (but this time by applying a silver leaf) to a handle for a tray that the blacksmith made. The handle should have been probably cromated or something to get the right appearance, but he couldn't do that.
I thought we could use the gilding technique again and I was at least ok with the result on the bed, but when I did the work here, I wonder how can I save it as it now looks as I have put on some foil....

The tray handle is not impressive.
I guess I need to look at some more tutorial to get it right... 

Thursday, January 23, 2020

Wonderwoman and the curtains

I did mention the curtains last time, so after this big teaser it is good to show at least some parts of the progresses.
On the sides of the windows (the four from the tower part and the other window) in the living room, there should be curtains in form of a drapery, hold together on the sides.
The textile was chosen and delivered. After a lot of thinking, as it is hard to make jugend style curtains in that area, i think, we picked some William Morris pattern. It is not really jugend, but it is often seen in old environments and it will work fine even if in the future we will have a wallpaper on those walls and not just the red paint.
Curtains, rolled up
Curtains have been sewed up, but as I miss the "inner" curtains and, especially, the rings to hold them up, I haven't put them up as it is probably not going ot be the smoothest operation.

The living room got also some further update when I quit my job at Assa Abloy. One of the girls in my team is an illustrator as thanking for my effort during the year there she made a wonderful drawing of WonderWoman, definitely my favorite character from the DC comics world.
We thought that the portrait would fit close to the board games (as in the playful part of the room, I guess)

WonderWoman portrait
WonderWoman and the board games
Finally, I thought yesterday that we live with the best shop ever closed to us. 
Erikshjälpen. I checked online what they had the other day and I spotted a letter holder in Jugend style. 
I went there and in a leap of an impulsive purchase I brought it home.

Letter holder
   At least some reward as in this period I am "spring cleaning" (in winter time) the kitchen and that's not funny at all...

Sunday, August 25, 2019

Nice summer weekend

It is fantastic that despite being in Sweden one can still get some summer days in August - this can be a quite rare event some year.
Anyway, thanks to this we have managed to (of course slowly) made some progresses in some of the billion of projects we have.

First. Mattias fixed properly the downpipe that collapsed.
However, the vine is still hoping for a better care.

The downpipe is back on its position

The vine needs desperately some support
Flowers are blooming in my most effort taking but satisfactory flower bed. The one behind the pool, which is enriched with ground elder and all sort of weeds one can think of. 
Though, every now and then, some of the flowers I try to plant to kick the bad stuff out, is emerging and shining.
Gladiolus

Dahlia of two colors.
And finally, a four year long project, a two year old birthday presence, is out to be installed. 
The famous outdoor clotheshorse (I wonder if this is the right translation for torkvinda) is almost in place. 
There is where the clotheshorse should be!
Finally, I have also managed to paint a bit of the poolhouse. This is quite an eternal project, as rather than the painting itself, going around with ladder and scaffolding to reach the different parts to paint is quite time consuming.

One layer more...


Sunday, June 30, 2019

An updated tower

When the work for painting the metal on the roof started last year, casually, some "older" metal suffered of the powerful washing that was performed. Well, in theory that is just a mere coincidence, but we are rather convinced that the reason why some serious holes appeared was surely not just because it was time...

Nevertheless, since our idea was to have metal sheets in titan (rheinzink), we agreed with the plater that we would have to wait this spring to have the work done, once because of course they were occupied but also because the rheinzink can be worked only when the temperature is over 10 degrees.

The metal was patched by the roof painter for surviving the winter. 
We booked so that they'd come in June and so they did. They remove most of the old metal and while I confirmed that they were going to use rheinzink, they stated that they were going to use, to my total surprise, galvanized metal.
Galvanized metal is not to be recommended to be used anymore, the roof experts say, as the passivation layer make the surface too perfect for being painted.
But this is nothing strange with the contractors. You agree on one thing and it turned out to be what they want.
"Cultural" metal sheets
Before having something we really don't want, I managed to suggest to use "cultural" metal sheets, which is metal sheet that has a prepainted layer at production. 
Luckily, not only they agreed with this and they had the material in their shed, so that is what it should be.

The point of the tower, between the roof and it, where the metal needed to be changed
Eventually, everything was done and the work concluded.
So, now the roof should last with this patch even longer (I wonder why the first roof company didn't fix it).
The metal patched seen from above.

The rods are up

Summer is here and thanks to some weeks of holidays, there are some progresses in some of them many projects that we start (and barely finish).
Let's give an update about what's happening with the curtain rods in the "red room" (also known as piano or tv room).

We are at the point where the rods are up, I have oiled them and we need to:
1) choose the curtain textile
2) buy all the accessories (rings, tie-backs, ...)
3) have the blacksmith coming here and cut the curved rod, since it is too long
4) fix the wall, as it got scratched (typical...) when the rod was put up

Curved rod, left side

Curved rod, right side
Once all is done, we will also add the quite beautiful knobs.

The knobs at the forge
The wall fasteners became pretty good at the end, but there is a little long history behind them.
The idea was to have some "jugend" inspired design. Something was defined during last summer, but that got lost in time and space.
I spent a quite rushed hour with the blacksmith trying to find something feasible and trying to remember how it was supposed to look, but that didn't work out exactly smoothly.
We came up with an idea, but that was not approved as it was too messy to have done in such a small piece.

A first attempt for the wall fasteners
Considering the space limitations, our blacksmith had to use a bit of creativity and make more trials, before, after a ping pong of pictures on Whatsapp, we gave our approval.
How shall we do this??

There, this should work! And in fact, it did!


Saturday, May 25, 2019

On the way to some curtains

We have an infinite amount of projects and, even though we have been living in the house for 7 years, in a sense, it feels like we have been just moved in.
We lack curtains, carpets, some things are still in a very temporary state.

One of the things that are crucial though are the curtains, not only for the sound, but of course mostly for the light. When the spring come, the longest days can be unforgiving.

The focus has been now the tv/piano room, as it has been impossible to play the piano when the sun has been hitting the room.

Where one of the curtain rods will be. Some of the supports have been already mounted. 
As the room has a circular form, due to the tower, we can't go for an ordinary solution and when thinking if we should have wood or metal, we went for a metal solution. 
The same kind of style will be applied to the curtain on the other window in the room.

The curtain rod
Our blacksmith, after few reminders, started to work on the curtain rod, which has to have the right shape. Sadly, it is not yet perfectly following the wall, so we will have to do some adjustements next time the blacksmith is home.
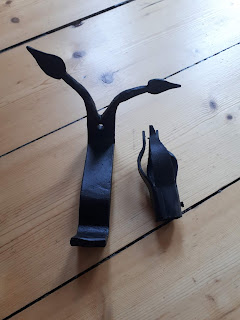

Support for the rod and end of it
There were a lot of discussions about the design of certain details. I thought we had been clear on it during the autumn, but everything couldn't be found, so we had to start from scratch and even though I wanted some other more "jugend" shape, that was the best we could agree upon.

Given the design of the curtain rod, we need to look into the curtains per se'.
And here we have some ideas that are not completely fixed yet.
Possibly 2-3 linen quite plain, as central curtains and then some drapery on the side, with the right kind of textile.
We thought of having something on green, to be a good match with the red of the wall. And from the initial idea, I am more convince that it should look as jugendish as possible, so the samples I have got I think will be discarded.
But I am volitile some things might change.
The first samples for the curtains
Apart putting up the curtain rod to get help in the shape, and decide the textile quality and style, I have also to find something to old the drapery together and rings to have the curtains on.
For the first, I might be asking the blacksmith as well...

Saturday, April 27, 2019

Things happens at times

It feels as we should celebrate since in the last weeks there are some of our projects that have made great step forwards.
First of all, I have finally completed the work on the attic window and I have put it back in its place after almost 2 years.
This is absolutely great as I can feel much more comfortable when it rains/there is wind/anything else. Finally, we have back a window there!

Bellevue got its window back
Of course, meeting relatives to the Pehrsson family boosted the historical investigation part and we have got also additional information. The textile that was weaved by Ellen Pehrsson for the stairs is long 4.4 meters and wide 95 cm.

The textile that was placed along the stairs
Additionally, I have actually carried forward the "torkvinda" (the outdoor dryer) project, by starting to oil it and paint it with the first layer. 
We have "just" to mount it somewhere in the garden and after that I have to give the final paint layers.
Oiled pieces

And this period is always signed with the "gardening" struggle (the garden is awakening and I simply don't manage to follow it up) and an illusion that there would be some spring cleaning. But of course, April means Easter and Isabella's birthday. The weather this year was great and we prepared a little jugend corner for our adult guests.
Coffee in the garden


Wednesday, March 27, 2019

March and spring

March can be potentially an interesting month. The garden is awakening at the first sun light, the days gets longer and the amount of things to do just explode as the garden kicks in.
Romeo is guarding the entrance during a sunny day

During this period I try to squeeze in even more.
1) I repot most of the plants. I don't know if also other human beings do this, but Feb-Mar (and often even April, as this year) I focus on the indoor plants.
Blurred example of the lucky bamboo after repotting
In the years I got some kalanchoe and I have managed to make the family expand. This year I am trying to make small plants from the ones I have, but they are not very popular anyway...
Baby Kalanchoe


2) The garden is getting alive. I start to cut when I can some bushes, like spirea or hortensia, before they start to grow too much. I also try to remove the carpet of leaves that are especially around the red beech. Spring flowers are popping up quite quickly.

Strong grape hyacinth are blooming

Daffodils (narcissus) taking space from the leaves
3) Seasonal change of clothes. Sometimes one can start already in March, not this year. Still pure set of winter clothes. In this case the improvement is that I got two clothes racks that I have put in the tower room, where once upon the time we had some huge and space taking wardrobes.
Now that they were gone, clothes have been hanged a bit inappropriately, so I am happy to have thought of this solution.
When it will get warmer I will switch the clothes...

Racks at the tower room
4) Easter. This is lent time and I decorate as always the house. I enjoy it a lot doing it with the kids.
This year påskris 


Thursday, November 2, 2017

Closing (almost) the doors

After several weeks of work and wasting a lot of time in other things, we finally got the doors back in their place.
The garage with its doors

Things worked almost fine, with a small exception (of course, as always it generates additional extra work). Since the bottom of the doors got cut off because in bad state and for avoiding to touch the ground, the "holder" doesn't reach the hole in the ground anymore, so the doors do not "stay put", so to speak.
I realize this explanation doesn't help much, but the only thing is that I will invoke the power of the blacksmith to come and see if there is anything smart he can do to fix the problem.
That's how they look inside (yes, temporary handle and still unfinished details)


That is not the only thing missing though. Painting of the metal is still prio 1 and, after putting the doors back, there are some minor patches that need to be painted again (the top of the door frame and the door got scratched initially, because the door was too "uptight", where the doors were leaning there are minor marks of the pieces of textile that were just under, ...) .
Still a lot of work to do... 


The main problem is that the season is not very favorable anymore for painting, although I have challenged the weather in many other occasions with discrete results.
Now, let's see how long more I have to deal with these doors until they can be really considered finished. Because, after all. I still miss the right handle to close them...! Blacksmith, where are you?!!?


Thursday, July 13, 2017

Sliding doors accessory

I am silent here, but it doesn't mean we are sitting on a couch watching a movie, or sitting outside enjoying the birds chirping... I doubt with my ambition I will ever sit down.
Said that, one thing that have disturbed me immensely has been one of the sliding doors. 
We have two pairs, being the two entrances to the "red room", the room where the piano and the Tv are located.
One of them had a nice, steady construction, painted white, so that the doors, when closing, hit that and stay "put".
The other one had a micro piece of wood, that after a while just gave up, fell off and the doors started to float from a side to another when moving.

So, we scraped off what was under the white paint and remove the piece of metal placed there (this we did it actually for another occasion (http://villabellevue1910.blogspot.se/2016/11/sliding-doors.html). I eventually went with it to my favourite blacksmith and with puppy eyes begged him to fix another one.

At the forge...(picture courtesy of Martin Hansson)
The good thing is that he was actually impressed by the piece of metal I had brought with me, and happily recreated another one.
When I went there, I actually brought him a bunch of... crap to fix. So, he managed also to fix some bookshelves holder for a jugend bookshelf we have.
Hand made bookshelf holder
I went though a couple of times back and forth with the "door stop" because the screws that I bought at Byggfabriken didn't tight the metal to the door frame and the first fix was done on the wrong side...
Adjusted so that the screws would tight it
Eventually, we got it properly done, so finally, both sliding doors can be closed properly.

Detail of the door frame

There, where the door stop is!